One of the more advanced features in PTGui Pro is viewpoint correction. Viewpoint correction allows one to use different
camera viewpoints in the same panorama, provided that the relevant part of the images is approximately flat.
It is particularly useful when including a handheld nadir image
in a panorama taken from a tripod.
Viewpoint correction is included in PTGui Pro only; the regular version of PTGui does not include this feature.
These photos were taken from two different camera positions. As a result the buildings in the background have moved relative to the position of the buildings in the foreground. While this may be an extreme example, in practise even camera movements of only a few centimeters may result in visible parallax if there are nearby objects in the scene.
It's not difficult to see that parallax is a problem when stitching photographs: a stitcher can either align the objects in the foreground or the objects in the background, but not both at the same time. Even worse: the optimizer will get severely confused, unable to determine the camera and lens properties, causing misalignments in other areas of the panorama as well. Unlike other artefacts like barrel distortion, correcting for parallax errors is impossible; the best one can do is attempting to mask the misalignments by retouching the stitched panorama afterwards.
So it should be clear that in order to avoid parallax, it is important to take all images from the same viewpoint. But there is one exception:

The first image shows the original photograph of a billboard, taken from the side. The second image is extracted from the first and transformed into a rectangular shape. The second image looks identical to a photo taken from a point in front of the billboard. So by transforming the image we have 'virtually' moved the camera position from the side of the billboard to in front of the billboard.
But this only works if the photographed subject is flat. If we would apply the same transformation to a larger part of the image, anything in front or behind the billboard surface would become severely stretched:
Although a panorama rarely consist of just a flat surface, this technique is still useful for panoramas. When photographing a spherical panorama, taking the nadir image (with the camera facing downwards) can be a challenge: in order to hide the tripod from the panorama, the photographer has to move the tripod away and shoot the nadir image hand held. It's nearly impossible to hold the camera at exactly the same viewpoint as the other images. Furthermore, the down facing image will inevitably include the photographer's feet, which have to be masked away. And finally, on a sunny day it is unavoidable to have the camera's (and the photographer's) shadow somewhere in the panorama.
Since many panoramas actually have a flat surface in the nadir (like a level street, or the floor in a room), these problems can be overcome by not having the camera in the same viewpoint when shooting the nadir image, and using the technique explained above to correct for the camera position offset. This is exactly what the viewpoint correction function in PTGui Pro does.
Since viewpoint correction only works on flat surfaces, any image which is viewpoint corrected must only have control points placed on a single flat surface. So when used in the nadir image, that image should have control points only on the floor. Therefore control points must be placed by hand; the control point generator in PTGui cannot tell whether a certain point is on the floor or not. The best results are achieved when using many control points (at least 10 is recommended), spread across the surface. With too few control points, or too closely spaced control points, the optimizer may get stuck, unable to determine the viewpoint.


Download example images and project files (10 MB Zip file)
Start PTGui, add the four images (img_2619.jpg to img_2622.jpg) to a new project and press Align Images. PTGui analyzes the images, adds control points and aligns the images. This results in the following preview (step1.pts):
In this example the alignment of the images can be improved a little more by editing control points: remove the control points which PTGui placed on (moving) clouds. Also we add a few extra control points at the top of the skyscrapers and on the tiles of the floor, to get a more even distribution of the control points across the entire image area. Choosing 'Minimize lens distortion: Heavy + Lens Shift' on the Optimizer page will give a better correction of lens distortion and compensate for the slight offset of the cropping circle to the actual image circle. Press F5 to optimize. This results in an average control point distance of 0.85, which is very good (step2.pts).
Since the camera was tilted slightly upwards the zenith is covered but the nadir is not. A nadir shot was taken to cover this hole:
To demonstrate the effects of parallax this nadir shot was deliberately taken with a large viewpoint offset: the camera was moved at least a meter from the original shooting position. The camera was at a different height as well, and tilted towards the point on the floor below the original shooting position.
Add the nadir shot to the project by dragging it (nadir.jpg) into the PTGui window. As explained above, we need to add control points for the nadir image by hand, and all control points in the nadir image must be on the ground surface:
Do this for all 4 images (step3.pts).
If we try to optimize the project (by pressing F5), the result is very bad (step4.pts):
The misalignment is of course caused by the camera offset of the nadir image, which the traditional image alignment model in PTGui cannot cope with. But let's enable the viewpoint correction:
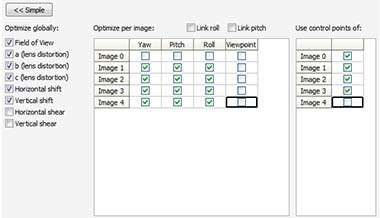
Switch the Optimizer to Advanced mode by pressing the Advanced button on the Optimizer tab. First we optimize the project without the control points of the nadir image. This enables PTGui to determine the proper lens parameters, without being distracted by the viewpoint offset in the nadir image. We do this by unchecking 'use control points of image 4' (step5.pts):
Press F5 to run the optimizer; the result should again be 'very good', and the first 4 images are actually aligned the same as they were before the nadir image was added.
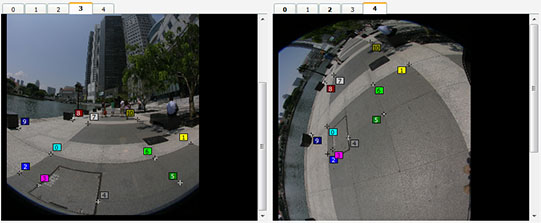
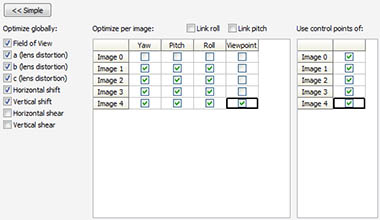
Now enable the control points of image 4 again, and enable the Viewpoint optimization for image 4 (step6.pts):
Again press F5 to run the optimizer. Note that the result is now 'very good', even with the nadir image included in the optimization. And this is what the alignment looks like in the panorama editor:
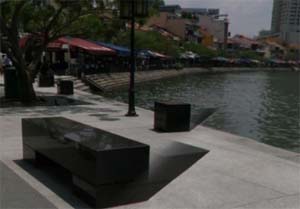
As we see the alignment on ground level is nearly perfect, despite the viewpoint offset. Note that anything above or below ground level is misaligned, such as the black cubes at the river side. Indeed, the viewpoint correction only works for a single flat surface; objects below or above the surface will suffer from parallax.
There's still one problem in the generated panorama: the blender has used part of the nadir images at the black cubes, which are not at ground level:
This is easily solved using the 'Blend priority' parameter. Go to the Image Parameters tab and reduce the blend priority of the nadir image from 100 to 25 (step7.pts). This causes the blender to use only the central part of the nadir image (plus a bit of additional overlap). See the online help for the Image Parameters tab in PTGui Pro for more information.
The result is a perfect nadir:
View the resulting panorama interactively.
Download the trial version of PTGui Pro
Viewpoint correction is included in PTGui Pro only; the regular version of PTGui does not include this feature.
Parallax
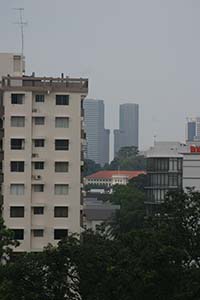
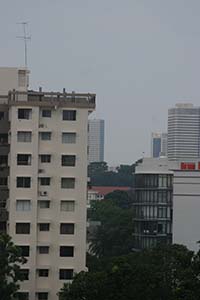
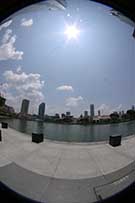
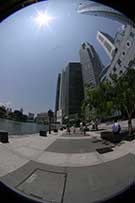
When photographing panoramas, rule number one is to shoot all images from exactly the same viewpoint. More specifically the camera should be rotated around the 'no parallax point' (the optical center of the camera/lens). Otherwise, parallax errors will occur. The following images show an example of parallax:
These photos were taken from two different camera positions. As a result the buildings in the background have moved relative to the position of the buildings in the foreground. While this may be an extreme example, in practise even camera movements of only a few centimeters may result in visible parallax if there are nearby objects in the scene.
It's not difficult to see that parallax is a problem when stitching photographs: a stitcher can either align the objects in the foreground or the objects in the background, but not both at the same time. Even worse: the optimizer will get severely confused, unable to determine the camera and lens properties, causing misalignments in other areas of the panorama as well. Unlike other artefacts like barrel distortion, correcting for parallax errors is impossible; the best one can do is attempting to mask the misalignments by retouching the stitched panorama afterwards.
So it should be clear that in order to avoid parallax, it is important to take all images from the same viewpoint. But there is one exception:
Perspective correction of flat images
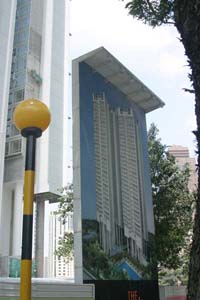
When the photographed subject is completely flat, we can correct the viewing perspective by stretching the image in a specific way. In Photoshop for example the Free Transform function can be used. This is shown in the following example:
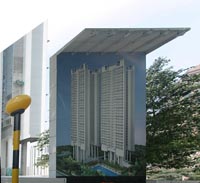
The first image shows the original photograph of a billboard, taken from the side. The second image is extracted from the first and transformed into a rectangular shape. The second image looks identical to a photo taken from a point in front of the billboard. So by transforming the image we have 'virtually' moved the camera position from the side of the billboard to in front of the billboard.
But this only works if the photographed subject is flat. If we would apply the same transformation to a larger part of the image, anything in front or behind the billboard surface would become severely stretched:
Although a panorama rarely consist of just a flat surface, this technique is still useful for panoramas. When photographing a spherical panorama, taking the nadir image (with the camera facing downwards) can be a challenge: in order to hide the tripod from the panorama, the photographer has to move the tripod away and shoot the nadir image hand held. It's nearly impossible to hold the camera at exactly the same viewpoint as the other images. Furthermore, the down facing image will inevitably include the photographer's feet, which have to be masked away. And finally, on a sunny day it is unavoidable to have the camera's (and the photographer's) shadow somewhere in the panorama.
Since many panoramas actually have a flat surface in the nadir (like a level street, or the floor in a room), these problems can be overcome by not having the camera in the same viewpoint when shooting the nadir image, and using the technique explained above to correct for the camera position offset. This is exactly what the viewpoint correction function in PTGui Pro does.
Viewpoint correction in PTGui Pro
Viewpoint correction is controlled by two groups of parameters: the Image Parameters tab (visible in Advanced mode) contains five parameters, labeled 'VP ...'. Further, the Optimizer tab (in Advanced Optimizer mode) has a checkbox labeled 'Viewpoint' for each image. By checking the checkbox, the optimizer will optimize the five 'VP ...' parameters, based on the given control points. The VP parameters perform a translation in 3 axes and a rotation along 2 axes. It's not necessary to understand their meaning since the values are determined by the optimizer.Since viewpoint correction only works on flat surfaces, any image which is viewpoint corrected must only have control points placed on a single flat surface. So when used in the nadir image, that image should have control points only on the floor. Therefore control points must be placed by hand; the control point generator in PTGui cannot tell whether a certain point is on the floor or not. The best results are achieved when using many control points (at least 10 is recommended), spread across the surface. With too few control points, or too closely spaced control points, the optimizer may get stuck, unable to determine the viewpoint.
Example
We have the following four images (Raffles Quay, Singapore):
Download example images and project files (10 MB Zip file)
Start PTGui, add the four images (img_2619.jpg to img_2622.jpg) to a new project and press Align Images. PTGui analyzes the images, adds control points and aligns the images. This results in the following preview (step1.pts):
In this example the alignment of the images can be improved a little more by editing control points: remove the control points which PTGui placed on (moving) clouds. Also we add a few extra control points at the top of the skyscrapers and on the tiles of the floor, to get a more even distribution of the control points across the entire image area. Choosing 'Minimize lens distortion: Heavy + Lens Shift' on the Optimizer page will give a better correction of lens distortion and compensate for the slight offset of the cropping circle to the actual image circle. Press F5 to optimize. This results in an average control point distance of 0.85, which is very good (step2.pts).
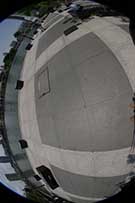
Since the camera was tilted slightly upwards the zenith is covered but the nadir is not. A nadir shot was taken to cover this hole:
To demonstrate the effects of parallax this nadir shot was deliberately taken with a large viewpoint offset: the camera was moved at least a meter from the original shooting position. The camera was at a different height as well, and tilted towards the point on the floor below the original shooting position.
Add the nadir shot to the project by dragging it (nadir.jpg) into the PTGui window. As explained above, we need to add control points for the nadir image by hand, and all control points in the nadir image must be on the ground surface:
Do this for all 4 images (step3.pts).
If we try to optimize the project (by pressing F5), the result is very bad (step4.pts):
The misalignment is of course caused by the camera offset of the nadir image, which the traditional image alignment model in PTGui cannot cope with. But let's enable the viewpoint correction:
Switch the Optimizer to Advanced mode by pressing the Advanced button on the Optimizer tab. First we optimize the project without the control points of the nadir image. This enables PTGui to determine the proper lens parameters, without being distracted by the viewpoint offset in the nadir image. We do this by unchecking 'use control points of image 4' (step5.pts):
Press F5 to run the optimizer; the result should again be 'very good', and the first 4 images are actually aligned the same as they were before the nadir image was added.
Now enable the control points of image 4 again, and enable the Viewpoint optimization for image 4 (step6.pts):
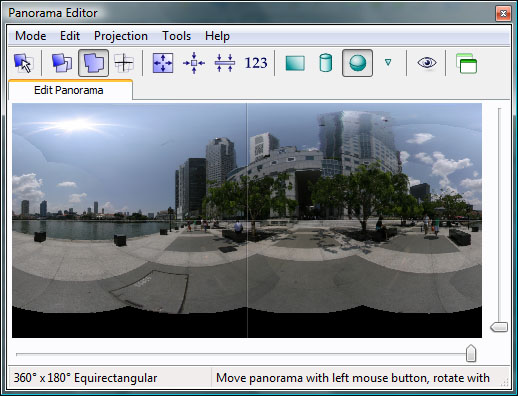
Again press F5 to run the optimizer. Note that the result is now 'very good', even with the nadir image included in the optimization. And this is what the alignment looks like in the panorama editor:
As we see the alignment on ground level is nearly perfect, despite the viewpoint offset. Note that anything above or below ground level is misaligned, such as the black cubes at the river side. Indeed, the viewpoint correction only works for a single flat surface; objects below or above the surface will suffer from parallax.
There's still one problem in the generated panorama: the blender has used part of the nadir images at the black cubes, which are not at ground level:
This is easily solved using the 'Blend priority' parameter. Go to the Image Parameters tab and reduce the blend priority of the nadir image from 100 to 25 (step7.pts). This causes the blender to use only the central part of the nadir image (plus a bit of additional overlap). See the online help for the Image Parameters tab in PTGui Pro for more information.
The result is a perfect nadir:
View the resulting panorama interactively.
Troubleshooting
It's possible that the optimizer gets stuck in a local minimum when trying to optimize the viewpoint, resulting in a 'very bad' optimization result. The optimization is less stable than normal due to the large number of parameters to be optimized for the nadir image, and the fact that there is a lot of dependency between those parameters. You can help the optimizer by providing a reasonable starting point. This can be done as follows:- In the Image Parameters tab set all VP values to zero.
- Optimizer: disable Viewpoint optimization for all images, enable 'use control points of:' for all images and optimize. This will give a bad optimization result (similar to the bad result shown above), but brings the nadir image into the appropriate orientation.
- Uncheck 'use control points of:' for the nadir image, leave Viewpoint optimization disabled and optimize again. This should give a good result, and set the lens parameters to the correct values.
- Now the optimizer should have a good starting point. Enable 'use control points of:' for the nadir image, enable Viewpoint optimization for the nadir image, and optimize again.
- Set the pitch of the nadir image to -90, and the yaw to 0. Reset the 5 viewpoint parameters of the nadir image to 0.
- On the Optimizer tab, disable the optimization of yaw and pitch of the nadir image and enable viewpoint optimization of the nadir image. Enable 'use control points of:' for all images.
- Run the optimizer
- If the optimizer reports a good or 'not bad' result, it has probably found the right position of the nadir image. Now enable yaw and pitch optimization for the nadir image and run the optimizer again.
Try it!
Download example images and project files (10 MB Zip file)Download the trial version of PTGui Pro