With a robotic panoramic head it's easy to take hundreds of photos at regular spacing. Just set the number of rows & columns and press Start. The robotic head will move the camera and release the shutter. By using a long lens panoramas of multiple gigapixels can be taken completely automatically.
PTGui has no problem stitching such extremely large panoramas. The Photoshop .psb file format supports panoramas of up to 300,000 pixels in width and length, i.e. up to 90 gigapixels. Stitching a gigapixel panorama is no different from stitching a smaller panorama, but in practise you'll often run into a problem: using a narrow angle tele lens increases the chance that a photo contains pure blue sky, only grass or a plain white wall. For such images it's impossible to place control points since there is no recognizable detail.
Align to Grid
To overcome this problem a feature called Align to Grid has been included in PTGui, accessible from the Project menu. This arranges all images into a grid of rows and columns. In practise there will always be small positioning errors in the robotic head. Therefore just arranging the images in a grid is not sufficient, we still need to align the panorama by generating control points and optimizing. Even if not all images have control points, the optimizer in PTGui 9.1 and later will attempt to keep the panorama aligned as well as possible. It does this by comparing the optimized panorama to the panorama prior to optimization (as set up by Align to Grid) and moving all images without control points in such a way that the grid setup is preserved as much as possible. And of course if an image contains only pure blue sky, small positioning errors will not be noticable so this method works well in practise.Example: Paris 80 image panorama
As an example we have taken 80 photos with a 100mm lens of Paris from the Sacré-Cœur: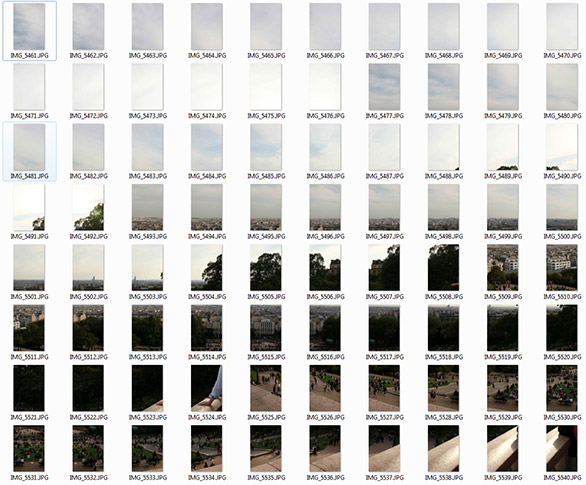
When stitched at full size this will give a 760 megapixel panorama. As you can see the first 27 images contain only sky, with hardly any recognizable detail.
To follow this tutorial you can download the source images and project files. To reduce the download size the images have been downsized to 2000x3000 pixels (from 3744x5616) and the jpeg quality has been reduced considerably. So this is not a true gigapixel panorama but it does show the workflow.
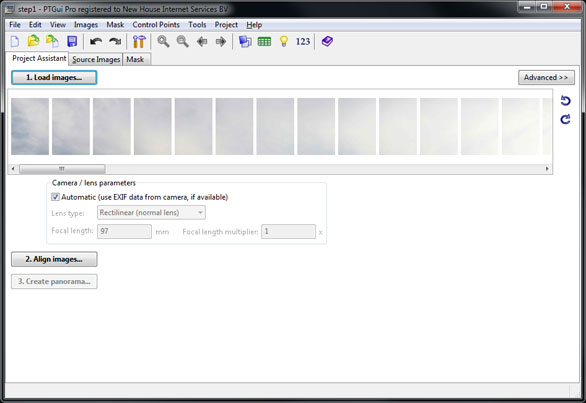
To start we launch PTGui and load our 80 images by pressing the Load Images button, or by dragging the images from Explorer or Finder onto the PTGui window:
Now we will arrange the images into a grid: choose Project -> Align to Grid:
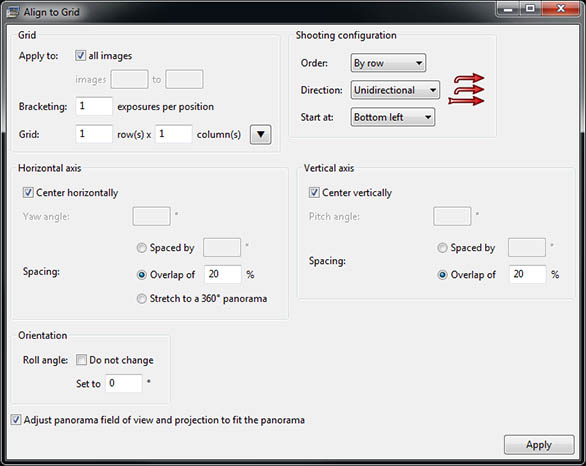
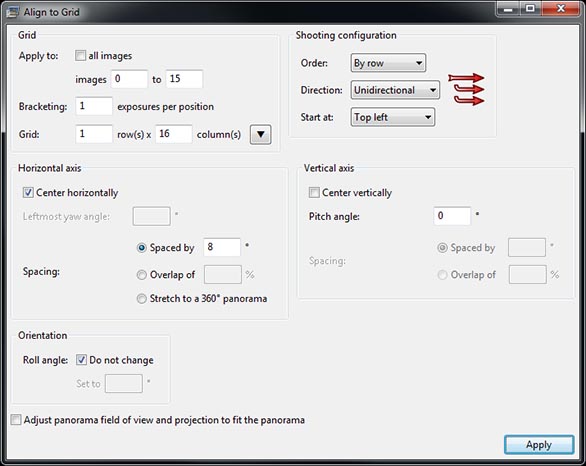
The grid setup window is divided into 5 sections. The top left section sets the number of rows and columns and configures to which range of images the grid will be applied to. By default the grid is applied to all images in the project, but you can also combine multiple grids by applying each grid to only a part of the project.
The top right section sets the shooting configuration. Panoramas can be taken by row or by column. Every row or column can be taken in the same moving direction, or in alternating directions ('zig zag'). The latter reduces the amount of travel required for the panoramic head. Finally one of 4 possible starting corners can be selected. This gives a total of 16 possible shooting configurations; the selected shooting configuration is indicated by the red arrows.
The other three sections in this window configure the horizontal (yaw) spacing, the vertical (pitch) spacing and the rotation (roll) of the images.
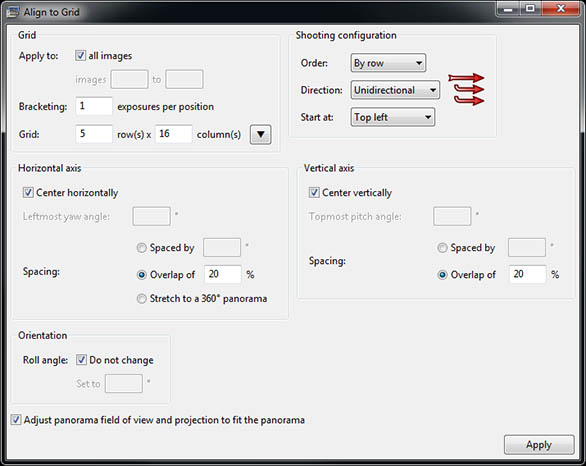
In this case the panorama consist of 5 rows of 16 images. The images were taken row by row, starting at the top left corner and each row was taken from left to right. We forgot to note the spacing or overlap of the images but PTGui will be smart enough to figure this out so we'll leave the overlap at the default 20% for now. The images are already oriented correctly, therefore we don't need to change the roll angle.
So we need to use the following settings:
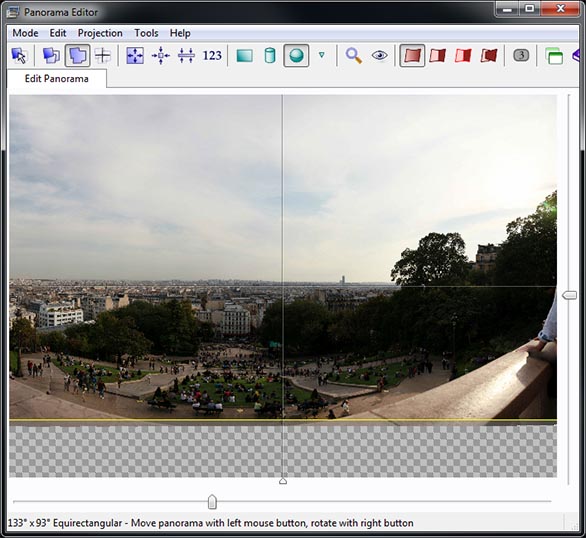
Press the Apply button to apply these settings. The result can be seen in the Panorama Editor; press Ctrl+E (Windows) or Command+E (Mac) to open it:
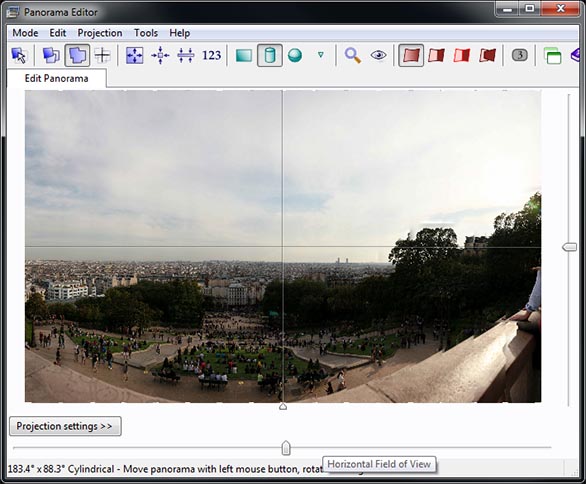
As you can see the images have been arranged correctly, although misalignments are visible because we have not entered the correct horizontal and vertical overlap.
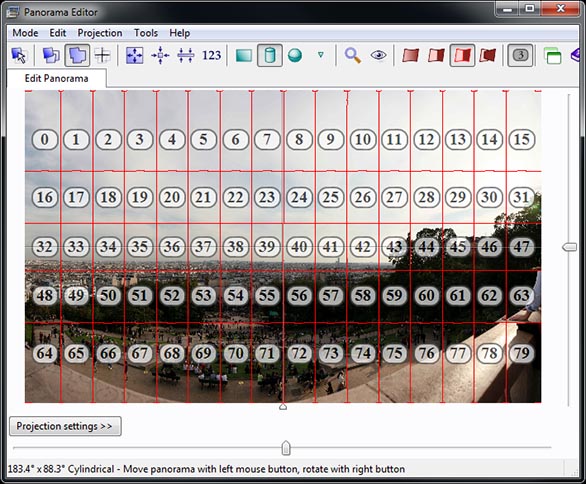
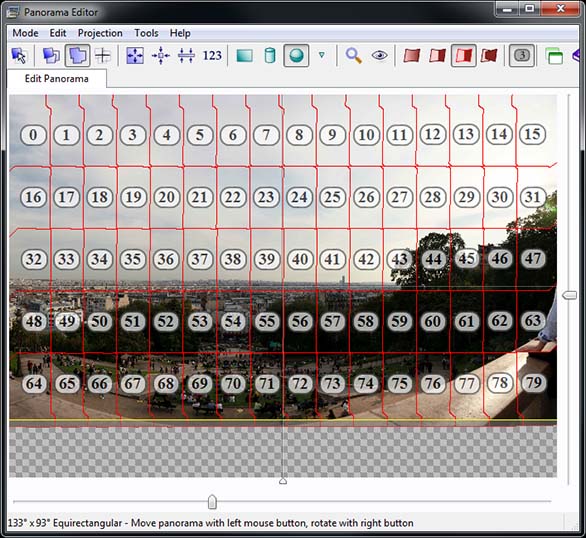
Switching to Show Seams mode and enabling Show Image Numbers allows us to see how Align to Grid has set up the panorama:
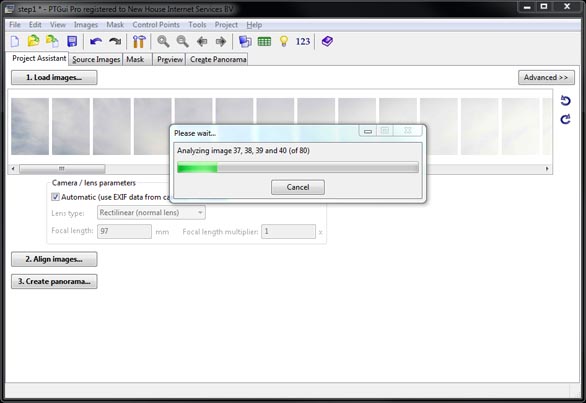
Now we need PTGui to find control points and align the panorama. Go to the Project Assistant tab in the main window and press Align Images:
When PTGui has finished aligning the panorama this is the result:
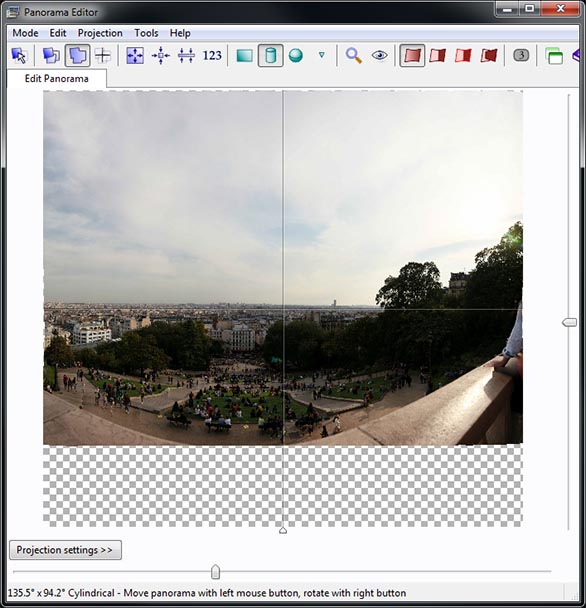
PTGui has chosen to use a cylindrical projection, but equirectangular looks better because it does not stretch the sky as much. We'll also decrease the field of view slightly and crop off the bottom part so the panorama fills the entire frame:
According to the Control Point Assistant the first row and most of the second row of images do not have any control points:
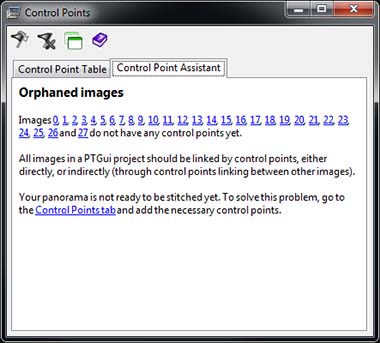
But this has not affected the alignment of the panorama. After generating control points PTGui found out that it had to increase the overlap between images in order to get them to align properly. For the 'orphaned' images (the images without control points) it has changed the overlap in exactly the same way, so they stay perfectly aligned with the rest of the panorama:
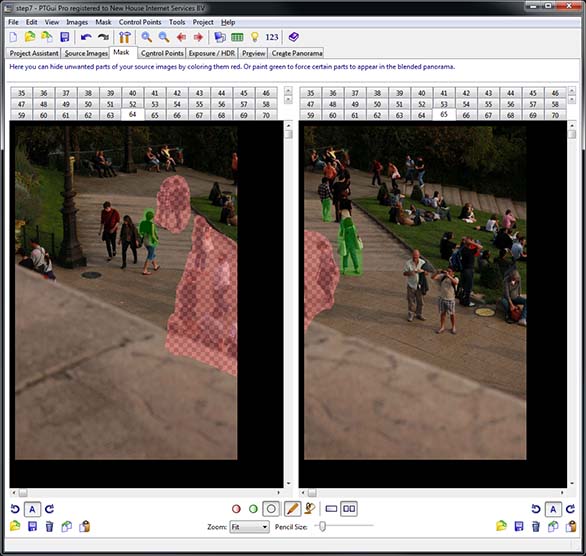
For panoramas such as these, taken with a long lens in crowded areas, blending faults are nearly unavoidable. But let's just mask out the most obvious problems (see the Masking Tutorial):
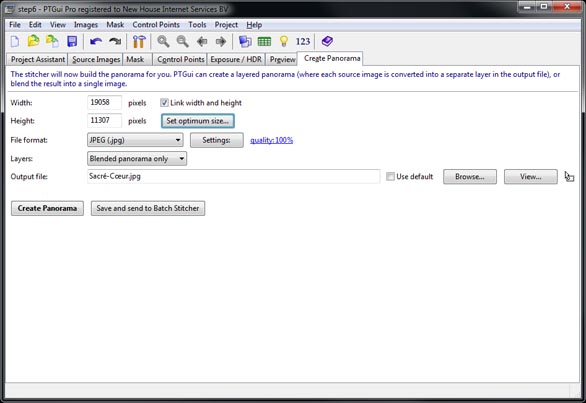
And we're ready to stitch! Go to Create Panorama, press Set Optimum Size and choose Maximum. Enter the desired output file name and press Create Panorama:
And here's the resulting panorama, displayed using the Zoomify viewer. Click in the image to zoom in:
Non uniform grids
The above example demonstrates a simple uniformly spaced shooting grid, with the same number of images on each row. But tilting the camera up or down has a side effect of increasing the horizontal overlap. In other words, for the upper and bottom rows of a panorama fewer images per row are needed than for the middle rows. Especially for spherical panoramas the number of images can be reduced significantly by using fewer images per row towards the nadir and zenith.The Align to Grid window does not directly support such non uniform grids but these panoramas can be set up by applying Align to Grid multiple times. Suppose for example we have taken two rows of photos:
- First row: 16 images, every 8° horizontally, at pitch 0°
- Second row: 12 images, every 12° horizontally, at pitch 20°
This applies a grid of 1 row by 16 columns to the first 16 images. Remember that image numbering in PTGui starts at zero, hence image 0 to 15. Since we only have one row, the vertical spacing is irrelevant. All images will get a pitch angle of 0°.
Press Apply. Next we enter the data for the second row:
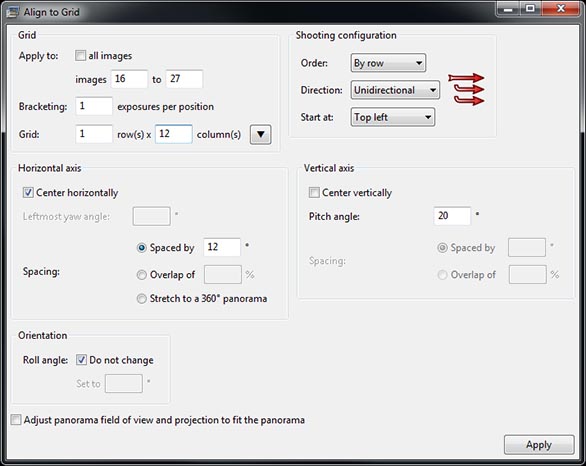
and press Apply again.
If you are going to stitch multiple panoramas with this configuration, use File -> Save As Template after setting up the grid. Then for subsequent panoramas use File -> Apply Template. The entire Align to Grid step can be skipped when using a template.
Shooting gigapixels without a robot
As we showed above PTGui is able to position orphaned images even if the exact amount of overlap or the image spacing is not known. But the actual spacing does have to be consistent with the grid. When shooting gigapixel panoramas without a robotic head you need to use a panoramic head with degree marks on the horizontal and vertical rotators, and take care to shoot at specified angles as exactly as possible.If for some reason PTGui does not position an orphaned image satisfactory, you can fix this manually by setting the Panorama Editor to Edit Individual Images Mode and dragging the image into place. The optimizer will attempt to keep the image in place during each optimizer run.
PapyWizard import
PapyWizard is a simple XML based file, produced by some robotic panoramic heads to record the yaw and pitch of each image. This file can be imported in PTGui through File -> Import -> PapyWizard. This positions all images as they were taken by the motorized head, so it can be used as an alternative for Align to Grid.PanoCatcher provides an online tool to create custom PapyWizard XML files for a given number of rows and columns.
Robotic panoramic heads
Some manufacturers of motorized panoramic heads:Nodal Ninja MECHA robotic panoramic head, with extensive PTGui support!
GigaPan Epic panoramic head
Clauss Rodeon
Seitz Roundshot VR Drive
PanoCatcher
SkyWatcher AZ-GTi
MIOPS Capsule PRO
Also see Mike Cowlishaw's notes on capturing multi row panoramas, reviewing several motorised heads.
...or build your own
Panorama robot head (instructables.com)The Gigabot Project (using Lego NXT)