When creating a panorama from multiple photos, moving objects can cause stitching problems.
For example a person walking around the scene may appear in the panorama
twice, or may even be cut in half by the seam between two overlapping images. Furthermore,
often you will have your tripod or your feet visible in the nadir shot of a spherical panorama.
PTGui Pro version 9 includes a new masking tool which can be used to prevent these problems. By masking you can tell the blender precisely which part of the images should or should not be visible in the blended panorama.
Let's take a look at the following panorama, taken at the Louvre in Paris. To follow the tutorial click here to download the source images and project files and open the project step1.pts in PTGui Pro:

The panorama was created from 5 fisheye images. The nadir image has been put in place using viewpoint correction.
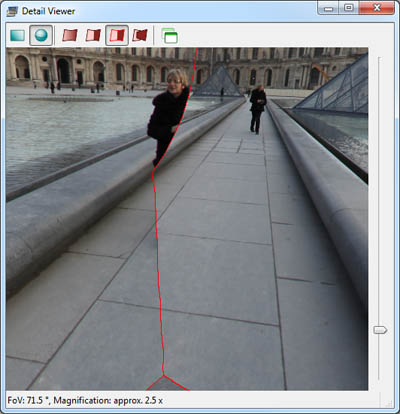
To take a closer look bring up the Detail Viewer using the detail viewer button ( ) in the Panorama Editor:

Two blending problems can be seen here: first of all the tripod from the nadir image is visible, and secondly we see only part of the lady approaching the camera.
Let us first remove the tripod from the nadir image. Go to the Mask tab and select the nadir image:
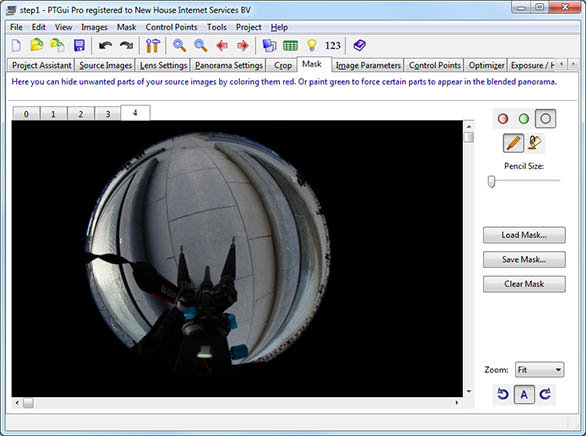
In the Mask tab we can paint using two colors: red and green. The red color is used to hide certain parts from the final blended panorama while we use the green color to indicate parts that we want to be visible in the panorama. If the PTGui blender encounters red masked pixels it will use pixels from the other overlapping images to fill the gaps.
Hide the tripod by painting it red. Two tools are available: the Draw tool can be used to draw free hand lines and the Fill tool fills an enclosed area. See the on line help in PTGui for more information. The result looks like this (step2.pts):

Actually since we have used viewpoint correction for the nadir image, and viewpoint correction only works for flat surfaces (see the viewpoint tutorial for more information), it's best if we also remove the rest of the nadir image except the ground surface (step3.pts):

Looking at the Detail Viewer, the tripod has disappeared completely! But the woman is still only partially visible:

If we switch the Detail Viewer to the 'Show Seams' mode using the button we see that she
is indeed cut in half by the seam:
button we see that she
is indeed cut in half by the seam:
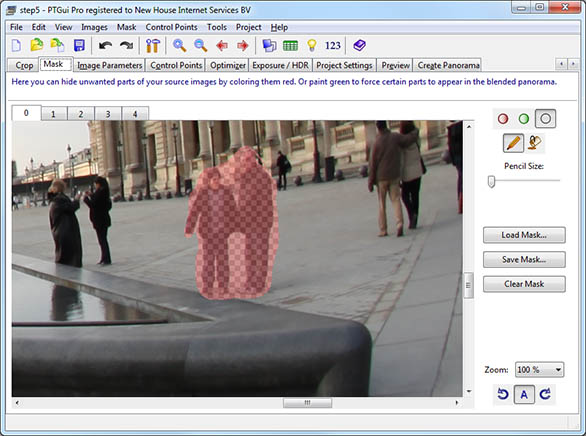
Since the lady is completely visible in one of the source images, we can use a green mask to make her visible in the panorama (step4):

The detail viewer shows that the green mask has indeed caused the seam to move:

After retouching one more problematic part (step5.pts):
the panorama is ready to be stitched!
After stitching we can use Tools -> Publish to Website to convert the panorama for viewing on the web. View the result by clicking on the image below:

Download the images and project files for this tutorial
Download a free trial version of PTGui Pro
PTGui Pro version 9 includes a new masking tool which can be used to prevent these problems. By masking you can tell the blender precisely which part of the images should or should not be visible in the blended panorama.
Let's take a look at the following panorama, taken at the Louvre in Paris. To follow the tutorial click here to download the source images and project files and open the project step1.pts in PTGui Pro:
The panorama was created from 5 fisheye images. The nadir image has been put in place using viewpoint correction.
To take a closer look bring up the Detail Viewer using the detail viewer button (
) in the Panorama Editor:
Two blending problems can be seen here: first of all the tripod from the nadir image is visible, and secondly we see only part of the lady approaching the camera.
Let us first remove the tripod from the nadir image. Go to the Mask tab and select the nadir image:
In the Mask tab we can paint using two colors: red and green. The red color is used to hide certain parts from the final blended panorama while we use the green color to indicate parts that we want to be visible in the panorama. If the PTGui blender encounters red masked pixels it will use pixels from the other overlapping images to fill the gaps.
Hide the tripod by painting it red. Two tools are available: the Draw tool can be used to draw free hand lines and the Fill tool fills an enclosed area. See the on line help in PTGui for more information. The result looks like this (step2.pts):
Actually since we have used viewpoint correction for the nadir image, and viewpoint correction only works for flat surfaces (see the viewpoint tutorial for more information), it's best if we also remove the rest of the nadir image except the ground surface (step3.pts):
Looking at the Detail Viewer, the tripod has disappeared completely! But the woman is still only partially visible:
If we switch the Detail Viewer to the 'Show Seams' mode using the
button we see that she
is indeed cut in half by the seam:
Since the lady is completely visible in one of the source images, we can use a green mask to make her visible in the panorama (step4):
The detail viewer shows that the green mask has indeed caused the seam to move:
After retouching one more problematic part (step5.pts):
the panorama is ready to be stitched!
After stitching we can use Tools -> Publish to Website to convert the panorama for viewing on the web. View the result by clicking on the image below:
Download the images and project files for this tutorial
Download a free trial version of PTGui Pro